Your cake stand’s diameter must match or exceed your bottom tier’s width—this foundational measurement determines stability and visual balance.
For single-tier cakes, choose a plate matching your cake’s diameter; for two-tier designs, confirm your stand equals or surpasses the bottom tier’s size.
Three- and four-tier structures demand baker consultation to verify compatibility.
Test your stand and board together beforehand, confirming the surface is flat and gap-free.
Learn which sizing mistakes compromise your cake presentations.
Start With Your Cake’s Bottom Tier Diameter

How do you know where to even begin? Start by measuring your cake’s bottom tier diameter—this single measurement becomes your foundation for everything that follows. You’re determining the minimum plate or stand size needed to support your creation safely. Think of it this way: if your bottom tier spans 12 inches across, you’ll need a stand at least that size, providing stability without compromise. For simply decorated cakes, match your stand directly to that diameter. However, if you’re planning elaborate fondant work, fresh flowers, or decorative elements cascading around the edges, you’ll want something larger—giving your design room to breathe and preventing any overhang issues. Coordinating with your baker on these exact measurements converts guesswork into confidence, allowing your presentation to reflect both elegance and structural integrity.
Why Cake Stand Size Must Match Your Cake Board

You’ll want your cake stand to match—or slightly exceed—your cake board’s diameter, creating a unified foundation that prevents the structural mishaps you’re trying to avoid: tipping, leaning, and that sinking moment when your carefully stacked tiers shift mid-celebration. Think of it this way: a stand smaller than your bottom tier is like building a skyscraper on an unstable base, whereas one that’s proportionally sized or generously larger supports your creation with the stability it requires. A flat, even surface on that stand isn’t just for appearance—it’s the foundation that keeps your cake’s base secure and your presentation polished.
Matching Board And Stand
Why does the relationship between your cake stand and cake board matter? Your cake board and stand must work in harmony to prevent disaster. When the board extends beyond your stand’s edges, you’re inviting instability and potential collapse. Match your stand size to your cake board dimensions for a balanced presentation.
| Consideration | Problem | Solution |
|---|---|---|
| Overhang | Board extends beyond stand | Choose larger stand |
| Stability | Uneven weight distribution | Match stand to board size |
| Aesthetics | Mismatched proportions | Consult baker beforehand |
Before purchasing, discuss stand dimensions with your baker. They’ll verify your selections align with your cake design and board measurements.
Preventing Structural Cake Damage
Because your cake’s foundation determines everything else—the elegant tiers, the intricate piping, the carefully placed sugar flowers—that flat, level top plate on your stand becomes non-negotiable. Even minor dips create structural stress that compromises your cake from the ground up.
Your cake stand size must match or exceed your bottom layer’s diameter to prevent tipping and unsupported overhangs. When boards extend beyond the cake itself, you’ll need an even larger stand to maintain stability and proper alignment with the cake’s edges.
Consider your cake’s decoration level when selecting cake stand size. Simply decorated cakes work beautifully on stands matching the bottom tier, while heavily embellished designs demand larger stands for security. Always coordinate with your baker—they’ll confirm your chosen stand accommodates the design and board extension for a stable presentation.
Cake Plate Sizes for Single-Tier Cakes

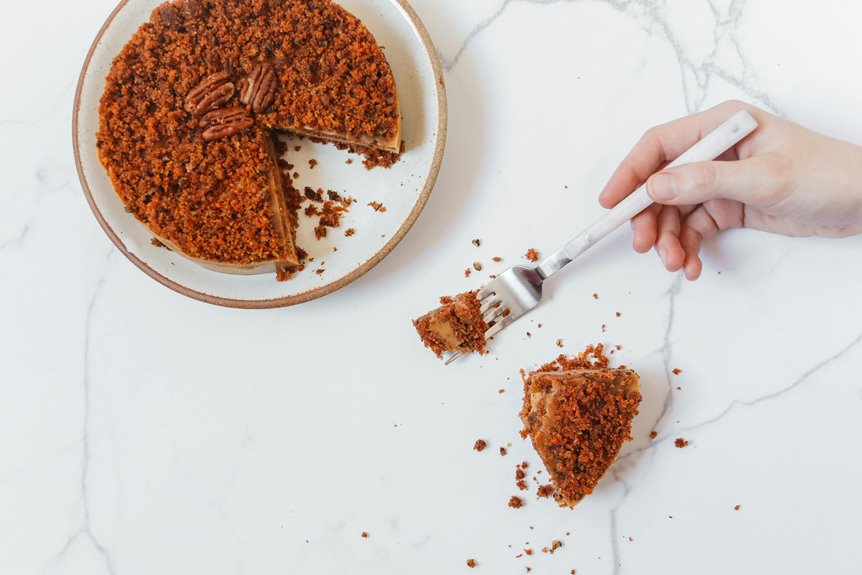
How do you choose a plate that’ll cradle your cake with stability and elegance? For single-tier cakes, your cake plate size should match your bottom tier’s diameter—creating that solid foundation. If you’re working with a 10-inch tier, select a 10–12 inch round or square plate that accommodates slight overhang without wobble. This sizing choice minimizes structural stress while maintaining visual balance, giving your dessert a polished presentation.
Hunt for flat, even surfaces without intrusive rims that interfere with support or slicing. These details matter—they’re what separates a hastily assembled presentation from one that feels deliberate and refined. When uncertainty creeps in, reach out to your baker directly. They’ll confirm the ideal cake plate size based on your specific bottom-tier dimensions and design vision, ensuring your creation gets the proper foundation it needs.
Two-Tier Cakes: Stand and Board Requirements

You’ll want to match your stand’s diameter to—or slightly exceed—your bottom tier’s board size, creating visual balance and structural stability that keeps wobbling at bay. Board-to-stand alignment matters: if your baker’s designed an extended board or added embellishments around the base, you’ll need a stand spacious enough to accommodate that extra surface area without awkward overhang. Think of it as architectural harmony—your stand becomes the foundation, your board the platform, and together they’re what prevent your two-tier creation from becoming precarious rather than polished.
Sizing Two-Tier Bases
When it’s time to stack cake tiers—transforming a simple dessert into an architectural display—the foundation becomes everything. You’ll want to approach sizing your two-tier bases strategically, considering how each element supports the next.
Here’s what you need to know:
- Match your stand to the bottom tier — this prevents wobbling and maintains stability
- Verify flat-top surfaces — they prevent your cake from sliding or tilting unexpectedly
- Confirm board extensions fit your stand — overhang creates structural vulnerability
- Collaborate with your baker — alignment between stand, board, and design matters significantly
You’re not just stacking cake; you’re creating visual harmony. Minimizing mismatches between stand and board sizes maximizes support while improving your presentation. This thoughtful approach makes a two-tier cake visually effective—exactly the kind of detail that belongs at your celebration.
Board-To-Stand Alignment
What keeps a cake stable and grounded on its stand? Board-to-stand alignment. Your cake board and stand need to work together—not compete with each other on your dessert table.
| Cake Style | Ideal Stand Size |
|---|---|
| Simply decorated | Match bottom tier |
| Large embellishments | Larger than bottom tier |
| Extended board design | Correspondingly larger stand |
| Minimal ornamentation | Same size as board |
| Statement pieces | 2-4 inches wider |
Your size guide matters. Never choose a stand smaller than your bottom tier—that’s asking for structural problems. Instead, coordinate with your baker beforehand, discussing board dimensions and stand specifications. This partnership allows your two-tier cake to sit securely, conveying the sophistication you’ve planned for.
Three- and Four-Tier Cakes: When to Consult Your Baker

As your cake plans grow taller—literally—the planning becomes more intricate and requires a direct conversation with your baker. Online stores typically cap their offerings at two tiers, so reaching out directly opens up possibilities for your three- or four-tier cake.
When you consult your baker, prioritize these essential discussions:
- Confirm three-tier dimensions (4.7 inches height) and four-tier specifications (6 inches height)
- Discuss cake stand compatibility with your chosen board extensions
- Verify that your cake stand remains level under the bottom tier’s weight
- Explore serving options—1 by 2 inches for three-tier, 1 by 1.5 inches for four-tier slices
This proactive dialogue helps your cake stand, boards, and structural integrity align correctly, turning your vision into a well-balanced result.
How Cake Decorations Affect Your Stand Choice

Your cake’s visual drama—those cascading sugar flowers, intricate piping, or towering fondant elements—demands serious consideration when selecting your stand. When you’re working with substantial decorations, you’ll need a stand noticeably larger than your bottom cake layer. This extra space accommodates those elaborate embellishments without cramping your design’s impact.
Here’s where your cake board becomes important. If your board extends beyond the cake itself, you’ll require an even larger stand to support that overhang safely. Think of it as creating a protective frame—your stand’s dimensions must honor both your cake and its decorative flourishes.
The practical approach? Match your stand size to your cake board size whenever possible. This strategy ensures stable presentation while eliminating those awkward mismatches that compromise your carefully crafted aesthetic.
Questions to Ask Your Baker Before Buying a Stand

Why wait until your cake arrives to discover size mismatches that’ll derail your event day plans? Asking your baker the right questions keeps your cake plate size aligned with your vision.
Asking your baker the right questions prevents size mismatches that could derail your event day plans.
- Request the exact bottom tier dimensions — confirm whether your stand should match the cake’s footprint or extend slightly larger for stability
- Ask about board extensions — cake decorations, sugar flowers, or fondant details may require additional overhang space beyond the tier itself
- Verify stand surface flatness — minor dips compromise your cake’s foundation and presentation, so confirm the top is completely level
- Get precise measurements in inches — whether round or square, diagonal footprints matter; written specifications prevent costly event-day surprises
Your baker becomes your partner in creating that moment when guests first see your cake.
Testing Your Stand and Board Fit Before the Event

You’ll want to verify your exact measurements with your baker, then bring your stand to the venue—or use their precise notes—to confirm everything aligns without gaps or wobbles. Compare your cake board’s dimensions against your stand’s base, checking that the board sits fully supported with no precarious overhang that could spell disaster mid-celebration. This hands-on test, done before event day, keeps what seems like a small detail from becoming an awkward mishap.
Verify Measurements With Baker
How do you know if that elegant 22-inch stand you’ve chosen will actually work with your baker’s vision?
Before committing to your purchase, reach out directly to confirm critical details:
- Ask whether the 22-inch measurement refers to the stand’s diameter, bottom tier size, or total footprint with cake board extension
- Request your baker specify exact stand and board dimensions needed for your event space
- Clarify if the cake board will sit flush without overhang or gaps
- Determine whether a square or round stand best aligns with your tiered design
Bring your cake board and stand—or precise templates—to the bakery for a test fit. This hands-on verification supports stability and visual harmony. You’re not just buying equipment; you’re orchestrating a polished presentation that reflects your celebration’s sophistication and care.
Bring Stand To Venue
When should you test whether your carefully selected 22-inch stand works in your venue’s space—the day before your celebration or weeks beforehand? Bring your stand and cake plate to the venue in person, testing the fit before guests arrive. Verify that your stand accommodates the bottom board with flat, gap-free contact—no wobbling allowed. For four-tier cakes or larger, confirm the 22-inch stand provides stable support without shifting. If you’re using an unconventional suitcase stand, measure everything on-site against your cake plate dimensions. Connect with baker or venue staff to verify your stand-and-board combination aligns with your cake’s size and design. This hands-on confirmation prevents last-minute presentation issues, letting you celebrate with confidence.
Compare Board And Base
The real test comes when you place your cake board directly onto your stand’s top surface—does it settle flat, or does it rock slightly, creating gaps that’ll compromise everything built above it?
You’re looking for proper alignment between your cake size and stand dimensions. Here’s what to verify:
- Check that your board sits flush without tipping or wobbling
- Confirm the board edges align evenly across the stand’s perimeter
- Avoid overhang that creates uneven weight distribution
- Test that the flat surface remains level when you apply gentle pressure
When your cake board matches your stand—same dimensions or the stand slightly larger—you’ve eliminated presentation concerns. This alignment between base and board keeps your display stable and professional, letting you present your creation with confidence.
Why Your Stand’s Top Surface Must Be Flat

Because even the slightest dip or wave in your cake stand’s top surface can undermine everything you’ve worked toward—sending your carefully frosted tiers tilting sideways or worse, cracking under their own weight—you’ll want to prioritize absolute flatness when selecting your stand.
A truly flat surface distributes your cake board’s weight evenly, preventing those frustrating shifts that compromise both structure and aesthetics. When your stand’s top plate lacks this essential flatness, you’re inviting instability that no amount of frosting expertise can fix.
Think of it this way: you’re building a foundation for edible architecture. Any recessed elements or raised spots demand ample surrounding flat surface area. Align your stand’s dimensions with your cake board size, minimizing overhangs while maximizing the stability you’ve earned through careful planning and skill.
Five Cake Stand Sizing Mistakes to Avoid

Now that you’ve mastered the foundation—that beautifully flat surface supporting your architectural ambitions—it’s time to sidestep the sizing pitfalls that could derail your presentation.
You’ll want to avoid these critical missteps:
- Choosing stands smaller than your cake size — this creates instability and looks disproportionate, undermining your careful design work
- Ignoring cake board extension — if your decorative board extends beyond the cake itself, you’ll need a larger stand to accommodate it properly
- Skipping the baker conversation — coordinate during planning so your stand matches the intended cake structure
- Selecting stands with textured surfaces — dips and raised elements damage foundations and compromise aesthetics
Match your stand size to your cake board dimensions, not just the cake itself. This alignment supports both visual harmony and structural integrity—the hallmarks of polished, professional presentations worth displaying.
Finding Affordable Cake Stands in the Right Size

Where do you find a cake stand that fits your budget yet matches your cake size? You’ve got more options than you’d think. Before purchasing expensive cake stands, explore vintage markets and thrift stores—you’ll find options like antique suitcases measuring 20 inches that work well. Test a 19-inch stand if your baker recommends it; sometimes smaller dimensions offer a good fit. Online retailers offer affordable options in square designs, important for matching your bottom layer’s footprint. The secret? Confirm measurements with your baker first—they’ll guide you toward stands that work with your cake design and board extensions. You’re investing in stability and style while keeping costs down.